Parse Address
Introduction
It may be useful to provide the user with the option to manually enter their address, if it cannot be found in the address suggestions returned from the address Lookup.
This involves appending an extra clickable option to the listed address suggestions that says something like "Can't find your address? Click here."
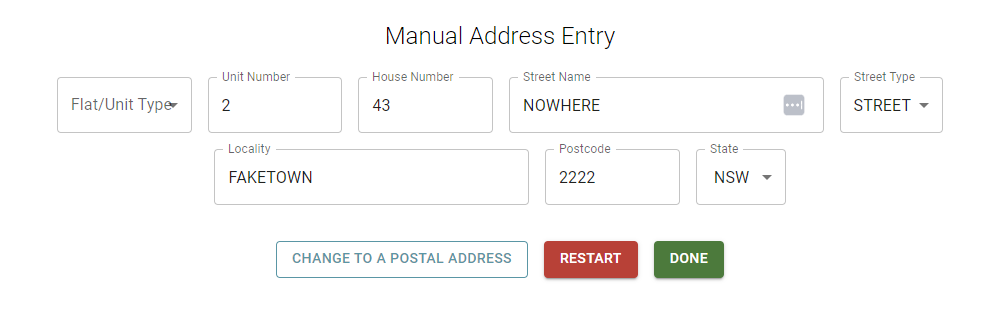
When the user clicks this option, AddressIT provides a function to do its best at breaking up the address text the user has already entered, allowing the population of individual address components in a form for manual entry.
See the Swagger Docs for more information on the Parse Address API function.
Example Implementation
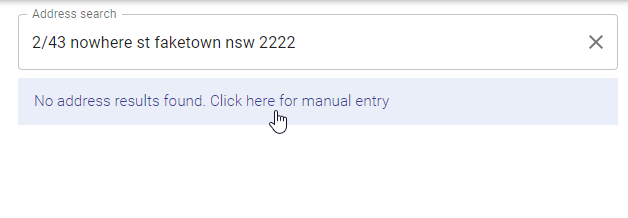
See the following example screenshots of how this could be implemented:


Implementation
See below for instructions and code examples of a basic implementation of this, again using JavaScript/React.
Add the "Address not found" entry to the suggestion list
Add a new "address suggestion" to the end of the suggestions returned from Lookup, that should show text similar to "Click here if you can't find your address".
In the code below, address suggestions have been converted into an object, with a type that identifies it as either an "address" or a "notfound". This differentiation allows you to set the way the item looks and behaves in your suggestions list.
Also, you will notice that if the Lookup returns no suggestions, then the "notfound" entry text is different, and has a text value of "No address results found. Click here for manual entry"
const addAddressNotFoundSuggestion = () => {
  if (!addressSuggestions) return;
  const addressNotFoundSuggestion = {
    type: "notfound",
    text: `${
      addressSuggestions &&
      (addressSuggestions.length === 0)
        ? "No address results found. Click here for manual entry"
        : "Click here if you can't find your address"
    }`,
  };
  if (
    addressSuggestions?.find(
      (s) =>
        s.type === "notfound" && s.text === addressNotFoundSuggestion.text
    )
  )
    return;
  if (addressSuggestions?.find((s) => s.type === "notfound")) {
    // replace the existing address not found suggestion
    const index = addressSuggestions.findIndex((s) => s.type === "notfound");
    const copy = [...addressSuggestions];
    copy[index] = addressNotFoundSuggestion;
    setAddressSuggestions(copy);
  } else {
    // add not found suggestion to the end
    setAddressSuggestions([
      ...(addressSuggestions || []),
      addressNotFoundSuggestion,
    ]);
  }
};
Pass input address string to Parse API function
Clicking on this "notfound" item should then initiate a call to the AddressIT Parse Address API function, with the address text that the user has typed so far as the input parameter.
Parse Address will do a best effort attempt to parse the address into separate components, which can then be used for manual user entry in their own input fields.
Here is an example of attempting to parse an address string typed by the user. Note this string can and most likely will be a partial address string.
 const attemptParse = async (userInput) => {
    const body = {
      inLine: userInput,
    };
    const token = "<my_api_token>";
    const method = 'POST';
    const headers = {
      Authorization: `Bearer ${token}`,
      "content-type": "application/json",
    };

    fetch("https://api.addressit.isw.net.au/parseaddress", {
      headers,
      method,
      body,
    })
    .then((response) => {
      return response.json().then((data) => {
        const { ok, status, statusText } = response;
        if (!ok) {
          return Promise.reject({
            message: data.message || data.errmsg || data.name,
            status,
            statusText,
            data,
          });
        }
        return data;
      });
    })
    .catch((err) => {
      console.log("Fetch error", err);
      return Promise.reject(err);
    });
  };
The address structure returned from Parse Address is a json object in the same format as from Process, e.g.:
{
  "DPID": "",
  "CompletionCode": 0,
  "HouseNBR1": "43",
  "HouseNBR1SFX": "",
  "HouseNBR2": "",
  "HouseNBR2SFX": "",
  "FlatUnitType": "",
  "FlatUnitNBR": "2",
  "FloorLevelType": "",
  "FloorLevelNBR": "",
  "BLDGPropName1": "",
  "BLDGPropName2": "",
  "LotNBR": "",
  "PostalDeliveryNBR": "",
  "PostalDeliveryNBRPfx": "",
  "PostalDeliveryNBRSfx": "",
  "PostalDeliveryType": "",
  "StreetName": "NOWHERE",
  "StreetType": "ST",
  "StreetSfx": "",
  "Locality": "FAKETOWN",
  "State": "NSW",
  "Postcode": "2222",
  "GeoLatitude": 0,
  "GeoLongitude": 0,
  "GeoConfidence": "",
  "GeoFeatureLabel": ""
}
Use returned address component structure in a manual entry form
Now that the individual address components have been returned, you can use them to populate text fields in a manual entry form. This will be a starting point for the user to complete entry of their address manually.
See below for a partial example (React/Material-UI) of using the address component data in input fields within a form, allowing the user to make changes to the address:
// inside an input form
 <TextField
    id="house-number"
    label="House Number"
    sx={{ width: "15ch" }}
    value={houseNumber1}
    onChange={(event: React.ChangeEvent<HTMLInputElement>) => {
      setHouseNumber(event.target.value);
    }}
  />
  <TextField
    id="street-name"
    label="Street Name"
    sx={{ width: "35ch" }}
    value={streetName}
    onChange={(event: React.ChangeEvent<HTMLInputElement>) => {
      setStreetName(event.target.value);
    }}
  />
  <FormControl>
    <InputLabel id="street-type-select-label">
      Street Type
    </InputLabel>
    <Select
      labelId="street-type-select-label"
      id="street-type-select"
      value={streetType?.ABBREVIATION || ""}
      label="Street Type"
      sx={{ minWidth: "10ch" }}
      onChange={(event: SelectChangeEvent) => {
        setStreetType(findStreetType(event.target.value));
      }}
    >
      {streetTypes?.map((type: StreetTypeData) => (
        <MenuItem key={type.ABBREVIATION} value={type.ABBREVIATION}>
          {type["STREET TYPE"]}
        </MenuItem>
      ))}
    </Select>
  </FormControl>